|
|
|
Electricity:

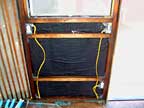
On December third, 2007 I ordered the parts for an off-grid solar electric power system, including four state-of-the-art powerful 216 watt Sanyo PV solar panels, aka: 'Photovoltaic Modules', to put on the roof of my utility house (formerly known as 'the shed'). Indeed, this would begin a new era in the saga of our Joshua Tree adventures. By December 21st everything that I ordered had arrived; a real nice Christmas gift, even though the UPS Scrooge (friend of mine) grumbled about my doing this at Christmas.
 I spent the next three months putting it all together. Some of the delay was due to trips outward to Tempe, Laguna Beach and other places, taking Eileen to LAX, the carport project and other small jobs. But the primary reason was that I had no idea what I was doing and I definitely did not want to screw it up. Such a learning curve can be time consuming because it involves a lot of sitting around with a cup of coffee or with a beer and staring at this exciting and scary collage of the latest in high tech solar electronics.
Since a power system also requires that there be something to power, it meant first installing about 350 feet of wire,
 twelve plug outlets, four wall switches and six lamps. In the little utility house this only meant moving a few things aside and drilling holes to run wire. In the trailer it meant tearing down the old walls (there go the originals again), running wire, adding or replacing insulation while I'm at it (in 1968 I put it in backwards), fitting the new walls and trim with cutouts in the right places, urethaning the new woodwork twice over, then installing the outlets, switches and overhead lamps, etc.. The following list depicts the more significant milestones as they happened:
| March 2 | began to wire utility house: 4 outlets, 2 switches, 3 lamps, conduit under deck to trailer. |
|---|---|
| March 18, 7:08 PM | flipped circuit breakers to ON. Lights in & out of the utility house lit. Outlet begins to power tools. |
| March 20, 11:14 PM | 2 outlets and switch become active in new wall left of doorway. Dining area track lamp wired from the switch is on. |
| March 23, 7:15 PM | 2 outlets and double-lamp became active over kitchen table at front of trailer. Old microwave begins cooking dinner. |
| March 26 to April 1 | 3 shelves under brass pool table lamp and outlet in utility house to become an office. |
| April 8 | new automatic cutoff thermal coffee brewer brewing. |
| April 9 | new energy efficient chest refrigerator arrives and is plugged in. |
| April 18 | 2 outlets installed in new wall over new storage chest - which was a wheel well on north side. |
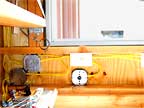
| April 20 | brass 2-light wall sconce over bathroom sink is on. |
| April 20 | light switch to pendant track lamp in bedroom is on. |
| April 30 | outlet under trailer over deck. |
| May 1 | outlet in new bedroom wall at rear of trailer. Also wired in a box for possible future lamp. |
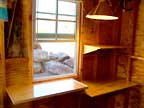
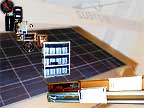
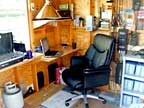 Notice the March 26 entry. Finally, after 7 years, I have an office. The large shiny new shelf in the corner serves as my desk with computer and misc desk things permanently in place. It even has its own comfortable executive swivel chair. Another smaller shelf above that holds the printer and misc. A third shelf to the left was to hold the camping stove and catch drips. However with the activation of the microwave and coffee maker there is little need for the stove anymore. Now the stove is closed up and the shelf serves as an extension to the desk. A bright wide brimmed adjustable brass lamp shines over it all. I love it. The entire procedure is or will be depicted in a pictorial essay on the
2007 Joshua Tree site.
Notice the March 26 entry. Finally, after 7 years, I have an office. The large shiny new shelf in the corner serves as my desk with computer and misc desk things permanently in place. It even has its own comfortable executive swivel chair. Another smaller shelf above that holds the printer and misc. A third shelf to the left was to hold the camping stove and catch drips. However with the activation of the microwave and coffee maker there is little need for the stove anymore. Now the stove is closed up and the shelf serves as an extension to the desk. A bright wide brimmed adjustable brass lamp shines over it all. I love it. The entire procedure is or will be depicted in a pictorial essay on the
2007 Joshua Tree site.The Milk Will Never Go Bad Again:
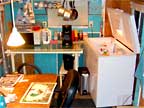
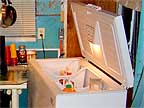 On April 9 our big 10 cubic foot
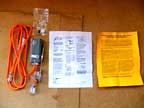
CROSLEY chest freezer arrived. The external thermostat that turns it into a refrigerator had arrived 2 days before on the 7th. The adjustable thermostat plugs into the wall and the freezer plugs into it. A temperature sensor hangs from the thermostat. I ran that under the freezer's lid and attached it to the freezer's 'cold spot' with silicone sealant. The cold spot is where the cold actually comes through the interior plastic wall. The directions that came with the thermostat were wrong, as the following email explains:
On April 9 our big 10 cubic foot
CROSLEY chest freezer arrived. The external thermostat that turns it into a refrigerator had arrived 2 days before on the 7th. The adjustable thermostat plugs into the wall and the freezer plugs into it. A temperature sensor hangs from the thermostat. I ran that under the freezer's lid and attached it to the freezer's 'cold spot' with silicone sealant. The cold spot is where the cold actually comes through the interior plastic wall. The directions that came with the thermostat were wrong, as the following email explains:
Many thanks Van for this input. It is critical and we appreciate it. Apologies for the inconvenience.
Scott
Backwoods Solar Electric Systems, 1589 Rapid Lightning Creek Rd, Sandpoint, Idaho 83864
www.backwoodssolar.com
----- Original Message -----
From: Van
To: 'Backwoods Solar'
Sent: Friday, April 11, 2008 7:42 AM
Hi John,
Somebody needs to rewrite part of the yellow sheet of directions that come with the thermostat. I almost made a stupid mistake because of the error.
It talks about attaching the sensor to the inside “wall near the bottom” of the Crosley freezer. It indicated that this area was clearly visible as “a horizontal band near the bottom”. I was trying to do this without turning the thing on first. The only thing that could possibly fit the description was a horizontal ridge near the bottom that wraps around the curved wall surrounding the compressor. To attach the sensor there would mean bending it to fit the curve horizontally. It could not be attached vertically because of the ridge. It would have helped if the directions had indicated whether the sensor should be attached horizontally or vertically. I can bend water pipe so I could probably bend the sensor bulb. I considered (and rejected) this.
Finally enough things didn't make sense that I decided to turn the freezer on to identify the cold area through condensation. I did so. The directions said that the condensation would appear “in a minute or two”. It actually took about ten minutes since the air is very dry here in the desert.
What finally appeared was a 5 or 6 inch band of condensation on the front and on the back going nearly the full width of the freezer ACROSS THE TOP! There was no band across the bottom that I could see. I attached the sensor horizontally at the center of the rear band.
It said to attach it with GE Silicone II. I had some GE Silicone I open which I suspect would have worked but I went ahead and drove the distance into town get a tube of GE Silicone II. It also specifically said to temporarily attach the ends of the sensor with “duct tape”. I had no duct tape and found it to be very expensive so I rebelled here: I had some 2” clear cellophane packaging tape so I used that (after cleaning with alcohol as directed). It worked fine. Three days later I removed it.
Please forward this to whomever writes your literature. I hope it helps.
Van
 I had ordered it on May 2nd after considerable research, especially on the U.S. Environmental Protection Agency's
ENERGY STAR web site, a great source of comparative information on appliances. I had held off doing this until completing the rebuild and wiring at the front end of the trailer. I wanted to know exactly what dimensions I had to work with. I also held off so that I could get a better 'feel' for what this solar system could handle. If it had any problems with my shop vac, for instance, it would probably have a problem with a fridge. I did not want to spend all that money for a fridge that would just blow circuits or consume all of the stored energy. As it turned out, it handled it like a charm and as far as I know the fridge is still running smoothly at this very moment. Well, at least it was when I departed on May 8.
I had ordered it on May 2nd after considerable research, especially on the U.S. Environmental Protection Agency's
ENERGY STAR web site, a great source of comparative information on appliances. I had held off doing this until completing the rebuild and wiring at the front end of the trailer. I wanted to know exactly what dimensions I had to work with. I also held off so that I could get a better 'feel' for what this solar system could handle. If it had any problems with my shop vac, for instance, it would probably have a problem with a fridge. I did not want to spend all that money for a fridge that would just blow circuits or consume all of the stored energy. As it turned out, it handled it like a charm and as far as I know the fridge is still running smoothly at this very moment. Well, at least it was when I departed on May 8.
 For 7 years we have lived out of camping coolers, making frequent emergency runs to town for a block of ice. Every morning I would pick it up and drain the melt water into a bucket. Lettuce would not last long and a gallon of milk would go bad before its time. Forget about keeping TV dinners or ice cream. They would turn to soup in a few hours. They would not last forever in this fridge either but I did get a couple of TV dinners, laid them on the bottom where it would be the coldest, and the second dinner was still good to go three days later. I haven't tried ice cream yet.
Our most recent cooler was 60 quart. That is 2.33 cu ft, so our new fridge holds 4.3 times as much stuff – exclude the block of ice and it is about 5 times as much. That's great! To help the fridge maintain an even cool they suggest loading it with stuff that will retain the temperature so I dropped in my spare 30 packs of beer and my backup water jugs. I imagine that when Eileen returns she will adjust this configuration but it works for me; it has removed much of the clutter that was stored on and under the glass kitchen table.
Another Road:
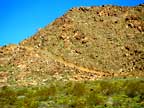
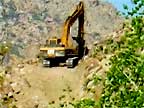
While all this was going on I was almost equally enthralled by another project happening at the opposite end of my street, the methodical excavation of a road up into another hill. I have written often about my own
similar endeavors up into my hill. This was also being done primarily by one man, but for hire and in a massive machine that I could only dream about. He also took much greater risks then I would have taken but he climbed that hill tread by tread, cutting his next step as he banked and tamped the area behind and around him. He was being paid big money, presumably by Prax Beard who owns the hill, so he was willing. He knew what he was doing. I watched him slowly progress upwards over a number of weeks until the excavation was stopped by some busy-body neighbor who turned the owner in for lack of a permit.
 Once when I was driving out for supplies I came across Ron, Lauren & Bill standing by Bill's place watching the distant excavation. They asked what I thought about it and I replied that it was one of the most exciting events that I had observed in quite some time, even if it was stealing some of my thunder. They just stared at me. Bill dourly commented, “He would!”.
Ron & Lauren's primary concern was for the natural habitat but when they later climbed the new road with buckets and shovels to rescue any turtles or vegetation in need of saving, they found nothing. That stretch of the hill was barren; nothing had ever succeeded in getting a foothold on that steep weather beaten slope of precarious boulders. At least now maybe some plants and animals will find some newly created terrain in which to do so. It is odd when you think about my similar but less exposed hillside that is so well populated with nature's manifestations.
In truth, I would not really want that machine on my place. In the process of excavating a road it would pulverize everything that it crawled over. I have worked hard to avoid damaging the surrounding terrain as I build my road. When I get it done, I want to be able to look back down the road and feel good about what I see.
A Means Of Support:
If you had viewed the photo essay on
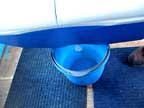
building the cradle under our trailer in March 2003 you would know that I was very proud of the ingenious beam designed to carry the trailer's axle. The bulk of the trailer's weight rested squarely on that beam. It was a sandwich of 2 x 6 boards and plywood glued and bolted together. The plywood was supposed to counteract any tendency of the 2 x 6's to warp.
 Much to my dismay, I discovered over time that the intense twisting force of the warps easily overcame the strength of the plywood, glue and bolts. Not only did the trailer take on a slight tilt but as the wood dried and cracked I was concerned that it could eventually break apart, disassemble and drop the trailer to the ground.
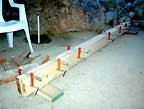
One day while checking out at Home Depot I noticed that the guy in front of me, another Marine veteran of about the same age, was buying a very sturdy looking 4 x 6 pressure-treated beam to replace a primary support under his deck. I was impressed. He did not feel that it would warp much over time since it was pressure-treated even though it had some knots in it.
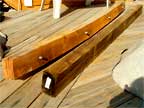
At home I measured the exact length of what I would need and then returned to Home Depot and had them cut one to that length. They can get a nice clean cut on their machine. I then returned home and set it in the sun, periodically rotating it over time to even out the effects of the sun. One good thing about this desert air is that green wood will dry quickly, allowing me to see how it will shape up before I use it. For this reason when buying lumber, not only do I take the time to select the very best, I also get a few extras so that down the line I will be able to choose the nicest ones, cutting up the remainder as needed to use as short pieces where a slight twist won't matter.
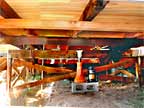 After two weeks it showed no deformity whatsoever. I jacked up the trailer, removed the old beam and installed the new one. I have not yet attached it; it is resting within steel brackets so it can't go anywhere but it can still twist and rotate in place if it needs to. I want it to adjust into whatever shape it needs and then on my return I will lock it down with screws through the brackets. Or rethink the whole thing. Also, the steel frame of the new carport has locked the cradle into place so that it cannot loosen, spread apart and drop the trailer.
|
|
|
Copyright © 2008, Van Blakeman |